Cat Stack Welcome Sign – Laser Cut Metal: A Guide to Perfect Cuts and Lasting Decor
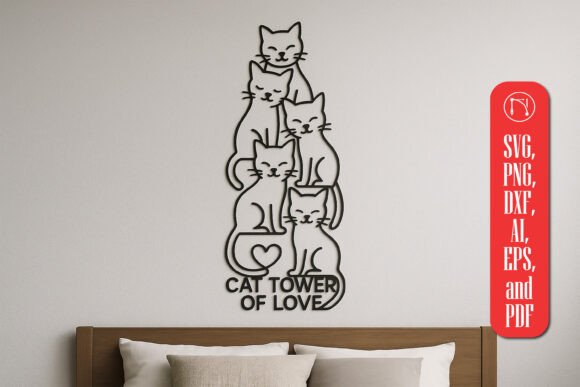
There is a distinct charm in greeting guests with a personalized touch that reflects your personality. For cat lovers, few designs capture that whimsical spirit quite like the Cat Stack Welcome Sign – Laser Cut Metal. This design features three adorable felines piled atop one another, their joyful expressions setting a warm tone for any entryway. However, transforming a digital file into a durable, professional-looking physical sign requires more than just hitting "print" on your laser cutter. Many creators rush into production without considering material compatibility, design scalability, or finishing techniques, leading to wasted resources and disappointing results.
Whether you are a hobbyist using a Glowforge, a small business owner scaling production, or a DIY enthusiast working with a Cricut, understanding the nuances of this specific design is crucial. The minimalist line-art style is elegant, but it demands precision. By avoiding common pitfalls in material selection and file preparation, you can ensure your final product is not only visually appealing but also structurally sound and weather-resistant.
Understanding the Design Potential
The appeal of the Cat Stack Welcome Sign lies in its versatility. The stacked cats create a vertical visual interest that works well on narrow spaces like door frames or gate posts. The inclusion of a customizable nameplate section at the bottom allows for personalization, making it an ideal housewarming gift or a unique addition to your own home. Because the design is provided in multiple formats—including SVG, PNG, DXF, AI, EPS, and PDF—it is compatible with a wide range of software and hardware.
However, the high resolution of 3000 x 2000 pixels does not automatically guarantee a perfect cut. Vector files like SVG and DXF are essential for laser cutting because they define paths rather than pixels. Raster images like PNGs, while useful for previewing, can lead to jagged edges if used incorrectly for cutting paths. Recognizing the difference between these formats is the first step toward a successful project.
Common Mistakes and How to Avoid Them
Even experienced makers can overlook critical details when working with intricate designs. Here are the most frequent errors encountered when producing metal welcome signs and how to correct them.
Ignoring Material Thickness and Kerf
One of the most costly mistakes is failing to account for the kerf—the width of the material removed by the laser beam. In a design with stacked elements, such as the three cats in this sign, tight spacing can cause pieces to fuse together if the kerf is not compensated for. This is particularly problematic in metal cutting, where heat accumulation can warp thin materials.
The Fix: Always perform a test cut on a scrap piece of your chosen metal. Adjust your design’s spacing to accommodate the specific kerf width of your machine. If the cats’ tails or ears are too close to the body or each other, slightly increase the gap in your vector software before cutting. This ensures clean separation and prevents the need for tedious post-cut cleanup.
Choosing the Wrong Metal for Outdoor Use
While steel is affordable and easy to cut, it is prone to rust when exposed to the elements. Many beginners choose mild steel for its ease of use, only to find their beautiful sign deteriorating within months when hung on an outdoor gate. This undermines the longevity and aesthetic value of the piece.
The Fix: For outdoor installations, opt for stainless steel, aluminum, or corten steel. Aluminum is lightweight and naturally resistant to corrosion, making it ideal for hanging on doors without heavy-duty hardware. Stainless steel offers a sleek, modern look that resists tarnishing. If you must use mild steel for its rustic appeal, ensure you apply a high-quality powder coating or weather-resistant paint immediately after cleaning the surface.
Overlooking Structural Integrity in Line Art
The minimalist line-art style of the Cat Stack Welcome Sign is charming, but it can be fragile if the lines are too thin. Thin metal strips can bend during handling, shipping, or installation. A sign that arrives bent or breaks easily will disappoint customers and damage your reputation as a creator.
The Fix: Review the vector paths for minimum line widths. A general rule of thumb for metal signs is to maintain a minimum stroke width of 3mm to 5mm, depending on the metal thickness. Reinforce connection points where the cats stack on top of each other. If the design feels too delicate, consider adding a subtle backing plate or frame to provide support without compromising the visual lightness of the design.
Neglecting File Preparation for Customization
The customizable nameplate section is a key selling point, but it often becomes a source of frustration if not handled correctly. Users may struggle to insert their family name or greeting if the file layers are not organized properly. Additionally, changing fonts without checking for compatibility can result in text that is too thin to cut or too complex to weed.
The Fix: Before offering the design for sale or personal use, ensure the SVG and DXF files have separate, clearly labeled layers for the cat stack and the text area. Provide instructions on recommended font styles—bold, sans-serif fonts typically cut cleaner in metal than intricate scripts. Test the customization process yourself to ensure that resizing the text box does not distort the surrounding design elements.
Best Practices for Professional Results
To elevate your Cat Stack Welcome Sign from a simple craft project to a professional-grade decor item, follow these practical steps.
- Pre-Cut Cleaning: Ensure your metal sheet is free of oil, dust, and oxidation. Residue can affect the laser’s focus and lead to uneven cuts or poor engraving quality.
- Power and Speed Calibration: Metal cutting requires precise balance between power and speed. Too much power can cause excessive melting and dross (slag) on the bottom edge, while too little power results in incomplete cuts. Start with manufacturer-recommended settings for your specific metal gauge and adjust incrementally.
- Post-Processing Care: After cutting, remove any dross using a file or sandpaper. Smooth all edges to prevent injury during handling. Apply a protective finish appropriate for your chosen metal—clear coat for aluminum or stainless, rust-inhibitive primer and paint for steel.
- Hardware Selection: Choose mounting hardware that complements the sign’s weight and style. For heavier metal signs, use sturdy screws and wall anchors. For lighter aluminum signs, adhesive mounting strips or decorative hooks may suffice. Ensure the hardware is also weather-resistant if the sign is installed outdoors.
Making the Right Choice for Your Project
Before downloading or purchasing the Cat Stack Welcome Sign – Laser Cut Metal file, assess your capabilities and resources. Do you have access to a laser cutter capable of handling metal? If you are using a diode laser, note that most consumer-grade diode lasers cannot cut metal directly; they are suitable for engraving coated metals or cutting stencils for painting. For direct metal cutting, you need a fiber laser or a CO2 laser with sufficient wattage and appropriate assist gases.
If you are a beginner, consider starting with a thinner gauge of aluminum or using the design as a template for plasma cutting or waterjet services if you do not own a metal-capable laser. Understanding your equipment’s limitations prevents frustration and ensures safety.
Ultimately, the goal is to create a piece that brings joy and warmth to your home or your customer’s entrance. By paying attention to material choice, design integrity, and finishing details, you can produce a Cat Stack Welcome Sign that stands the test of time. This thoughtful approach not only enhances the aesthetic appeal but also ensures durability, making it a cherished addition to any cat-loving household.