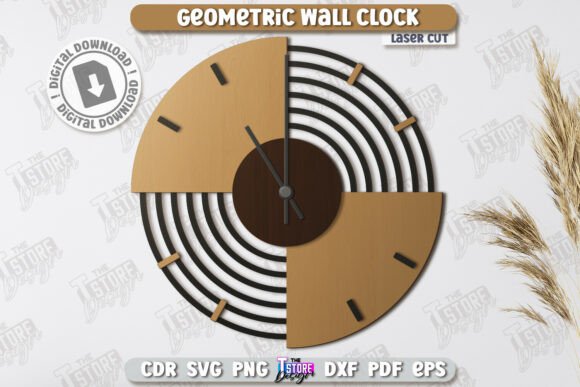
Geometric Wall Clock Laser Cut Design Guide
Imagine a blank wall in your living room or office. It feels empty, lacking personality. Now, picture a striking timepiece made of wood or acrylic, featuring sharp angles and interlocking shapes that cast dynamic shadows as the sun moves across the room. This is the appeal of a geometric wall clock laser cut design. It is more than just a way to tell time; it is a statement piece that bridges the gap between functional utility and modern art. Whether you are a hobbyist with a new machine in your garage or an interior designer looking for unique accents for a client, understanding how these designs work and who they serve best can transform a simple project into something remarkable.
At its core, this type of design relies on precision. The files provided for these projects typically come in a zip archive containing multiple formats like SVG, EPS, PNG, PDF, and DXF. This variety ensures compatibility with almost any software or hardware setup. However, the magic happens in the execution. A standard instruction set for these files often specifies that red lines indicate where the machine should cut through the material, while black lines denote areas to be engraved. This color-coding system simplifies the workflow, allowing creators to focus on material selection and finishing rather than wrestling with vector paths.
Why Different Creators Choose Geometric Designs
The reasons for choosing a geometric wall clock laser cut design vary wildly depending on who is holding the digital file. For a beginner just learning the ropes of CNC technology, the primary draw is often ease of use and reliability. These designs usually feature clean lines and straightforward assembly, reducing the risk of material waste due to complex, fragile connections. A novice might prioritize the learning value, using the project to understand how different file formats behave in their specific software environment.
In contrast, a professional entrepreneur or small business owner views the same file through a lens of commercial value and speed. They are less concerned with the learning curve and more focused on production efficiency. Can this design be cut quickly? Does it minimize material usage to maximize profit margins? Is the final product durable enough to ship without breaking? For them, the inclusion of DXF files is often critical, as these tend to maintain dimensional accuracy better than SVGs in industrial settings, ensuring every unit sold meets strict quality standards.
Navigating File Formats and Software Compatibility
One of the most practical aspects of working with these decorative clocks is managing the digital assets. While having access to SVG, EPS, PNG, PDF, and DXF files offers flexibility, it also requires technical awareness. Users of popular software like Lightburn need to be particularly cautious. It is a known issue that Lightburn can sometimes distort the dimensions of files, especially when importing SVG formats. This distortion might seem minor on a screen but can result in a clock mechanism that does not fit or pieces that do not align perfectly in the physical world.
To avoid these pitfalls, experienced users often recommend sticking to the DXF file format when working within Lightburn. DXF files generally preserve the original scale and geometry more reliably, leading to better results and less frustration. If you find yourself struggling with a specific format or need a variation in size or color for a PNG preview, reaching out to the creator is often a viable solution. Many designers are willing to provide alternative files to ensure your project succeeds, highlighting the collaborative nature of the digital maker community.
Tailoring the Project to Your Goals
How you approach this project should depend on your end goal. Are you making a single piece for your home, or are you planning a production run?
- Home Decor Enthusiasts: If you are a consumer looking to upgrade your space, your priority is likely aesthetics and customization. You might choose a bold geometric pattern to serve as a focal point in a minimalist room. The ability to select your own wood stain or acrylic color allows you to match the clock perfectly with existing furniture.
- Educators and Makerspace Managers: For those teaching others, the value lies in the educational potential. Assembling a laser-cut clock teaches students about geometry, spatial reasoning, and the mechanics of timekeeping. It provides a tangible reward for learning CAD basics or machine operation.
- Freelance Designers: Creativity and flexibility are key here. A designer might take the base geometric concept and modify the vector paths to create a bespoke version for a high-end client, adding unique engravings or altering the shape to fit a specific brand identity.
Material Choices and Finishing Touches
The beauty of a geometric wall clock laser cut decorative clock lies in its versatility with materials. While plywood and MDF are common choices for a warm, natural look, acrylic offers a sleek, modern vibe that plays beautifully with light. When the laser cuts through acrylic, the edges often polish themselves, creating a crystal-clear finish that enhances the geometric facets. On wood, the engraving (marked by black lines in the design file) adds depth and texture, highlighting the grain and making the numbers or patterns pop.
Regardless of the material, the assembly process is where the design comes to life. Most kits are designed to be intuitive, slotting together without the need for excessive glue or hardware. However, attention to detail during sanding and finishing can elevate the final product from a DIY craft to a professional-grade item. Applying a high-quality sealant or paint can protect the material and enhance the visual contrast between the cut and engraved areas.
Making the Right Decision for Your Workshop
Before downloading or purchasing a design, consider your current setup and skill level. If you are new to laser cutting, ensure your machine has the power to cut through your chosen material thickness cleanly. Check that your software can handle the file types provided; if you rely heavily on SVGs, test a small piece first to check for scaling issues. If you are running a business, calculate the material yield per sheet to understand your cost basis.
Ultimately, a geometric wall clock is a project that scales with your ambition. It can be a weekend afternoon activity for a hobbyist or the cornerstone of a new product line for an entrepreneur. The key is to respect the technical requirements—like using DXF over SVG in certain software environments—while embracing the creative freedom these designs offer. By understanding the nuances of the files and the needs of your specific audience, whether that audience is your family or your customers, you can create a timepiece that is both functional and visually stunning.
If you ever encounter hurdles with file compatibility or need specific adjustments, remember that communication is vital. Many creators encourage users to send a message if they have questions or require different file types. This support network ensures that whether you are a blogger documenting your journey, a publisher illustrating a guide, or simply someone who loves modern interior décor, you have the resources needed to succeed. Follow creators whose work resonates with you to stay updated on future releases, ensuring your feed is always filled with fresh inspiration for your next great build.