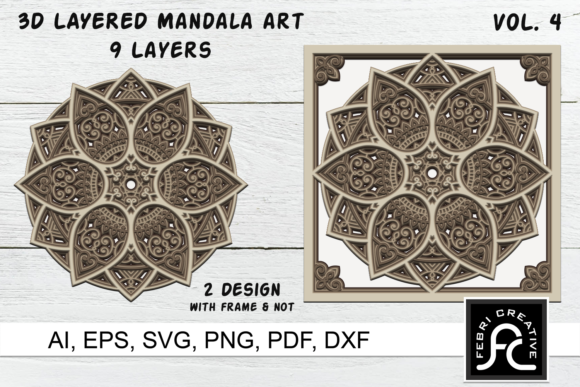
Mastering 3D Layered Mandala Art 4 - SVG for Precision Crafting
Digital crafting has evolved significantly, moving beyond simple two-dimensional cuts to intricate, multi-layered designs that create stunning visual depth. Among the most popular formats for this style is 3D Layered Mandala Art 4 - SVG. These designs allow crafters to build complex geometric patterns layer by layer, resulting in a piece that looks like it was carved from a single block of material. However, the transition from downloading a file to holding a finished, professional-quality piece is not always straightforward. Many enthusiasts stumble over technical nuances that can compromise the integrity of their final product.
Understanding the specific structure of your digital assets is the first step toward success. When you purchase a high-quality package like this one, you are not just buying an image; you are acquiring a toolkit. The included ZIP file contains a meticulously organized set of resources designed to accommodate various machines and skill levels. Inside, you will find two primary design folders: one containing the mandala design with no frame and another with a framed version. This distinction is crucial because not every project requires a border, and having both options prevents the need for manual editing, which can often introduce errors if you are not proficient with vector software.
The Trap of Ignoring File Formats
A common mistake among beginners is assuming that all vector files are created equal. You might be tempted to use whichever file opens fastest, but this approach can lead to significant issues during the cutting or printing process. The download includes ten SVG files, ten DXF files, along with AI, EPS, PDF, and PNG formats. Each serves a specific purpose. For instance, SVG (Scalable Vector Graphics) is the gold standard for most modern cutting machines like Cricut and Silhouette because it retains scalability without losing quality. DXF files, on the other hand, are often preferred by users of older software or specific industrial plotters.
If you attempt to use a rasterized PNG for cutting instead of the vector SVG, you will encounter pixelation when scaling up, leading to jagged edges and poor cut quality. The included PNGs are high-resolution at 300 dpi with a transparent background, sized at 12 x 12 inches. These are perfect for sublimation printing or digital mockups, but they are not suitable for precision cutting. Always verify that you are selecting the vector format compatible with your specific hardware. Using the wrong file type does not just affect aesthetics; it can waste expensive materials like cardstock, vinyl, or wood veneer.
Misunderstanding Layer Organization
One of the most overlooked details in layered art is how the layers are structured within the files. This package provides ten files per format: one master file containing all nine layers combined, and nine separate files where each layer is isolated. Novices often make the error of using the single combined file and attempting to separate the layers manually within their cutting software. This is time-consuming and prone to human error. If you accidentally delete a small anchor point or misalign a path during separation, the entire 3D effect can be ruined.
The smarter approach is to utilize the pre-separated layer files. These have been professionally optimized to ensure that every curve and corner aligns perfectly with the adjacent layers. By importing the individual layer files, you maintain the designer’s intended spacing and registration marks. This ensures that when you stack the physical layers, the shadows and depth appear natural. If you are new to layered mandalas, start by examining the individual SVGs to understand how the complexity builds from the center outward. This insight helps in planning your color choices and material thickness.
Neglecting the Extraction Process
It sounds trivial, but failing to properly extract the ZIP file before use is a frequent source of frustration. Some users attempt to open files directly from the compressed folder. This can cause software glitches, corrupted previews, or permission errors when saving changes. Always right-click the ZIP file and select "Extract All" to a dedicated folder on your computer. This ensures that all associated metadata and file links remain intact. Furthermore, keeping your original downloaded ZIP file as a backup is a wise habit. If you accidentally overwrite a modified SVG, you can always return to the pristine original.
Choosing the Right Frame Option
The inclusion of both framed and unframed designs offers flexibility, but choosing the wrong one can disrupt your composition. A framed mandala provides a clean, finished edge that is ideal for wall art or coasters where the outer boundary needs to be defined. However, if you plan to integrate the mandala into a larger collage or use it as a central element in a shadow box, the frame might feel restrictive. Conversely, using the unframed version for a standalone piece might leave you with uneven edges that require additional trimming.
Before you begin cutting, visualize the final placement. If you are creating a gift item, the framed version often looks more polished and requires less finishing work. For experimental projects or mixed-media art, the unframed option allows for greater creative freedom. Check the dimensions of your base material against the design size. Since the files are scalable, you can adjust the size, but remember that increasing the size too much may require thicker materials to maintain structural integrity, while shrinking it too much might make the inner layers impossible to weed or assemble.
Material Selection and Assembly Errors
Even with perfect files, the choice of material can make or break your 3D effect. A common misconception is that any cardstock will work. In reality, the weight and texture of the paper influence how well the layers adhere and how distinct the shadows appear. Thin paper may warp under glue, causing misalignment, while overly thick cardboard might be difficult to cut cleanly on standard home machines. Test cuts are essential. Use the individual layer files to cut a single prototype of the most intricate layer. This allows you to adjust blade depth and pressure settings without wasting a full set of materials.
When assembling, avoid using wet glues that saturate the paper. Liquid adhesives can cause warping, which destroys the precise alignment needed for the 3D illusion. Instead, opt for double-sided tape dots or spray adhesives applied sparingly. Start from the center layer and work your way out, using a light box or window to ensure each layer is centered perfectly over the previous one. Rushing this step is the quickest way to end up with a lopsided mandala.
By paying attention to these technical details—file formats, layer organization, proper extraction, frame selection, and material handling—you elevate your crafting from amateur to professional. The 3D Layered Mandala Art 4 - SVG package is designed to simplify your workflow, but it requires a mindful approach to unlock its full potential. Take the time to understand your tools and materials, and you will create pieces that are not only visually striking but also structurally sound.